This is a consolidated guideline on best practices in bird photography. Views expressed in this page are our opinion only and not necessarily be followed as universal guideline. This is to share what we perceive as correct and we recommend to be followed. Photography is an art and every artist has his / her rights to express his art in the way he / she wants.
WHEN NOT TO CLICK
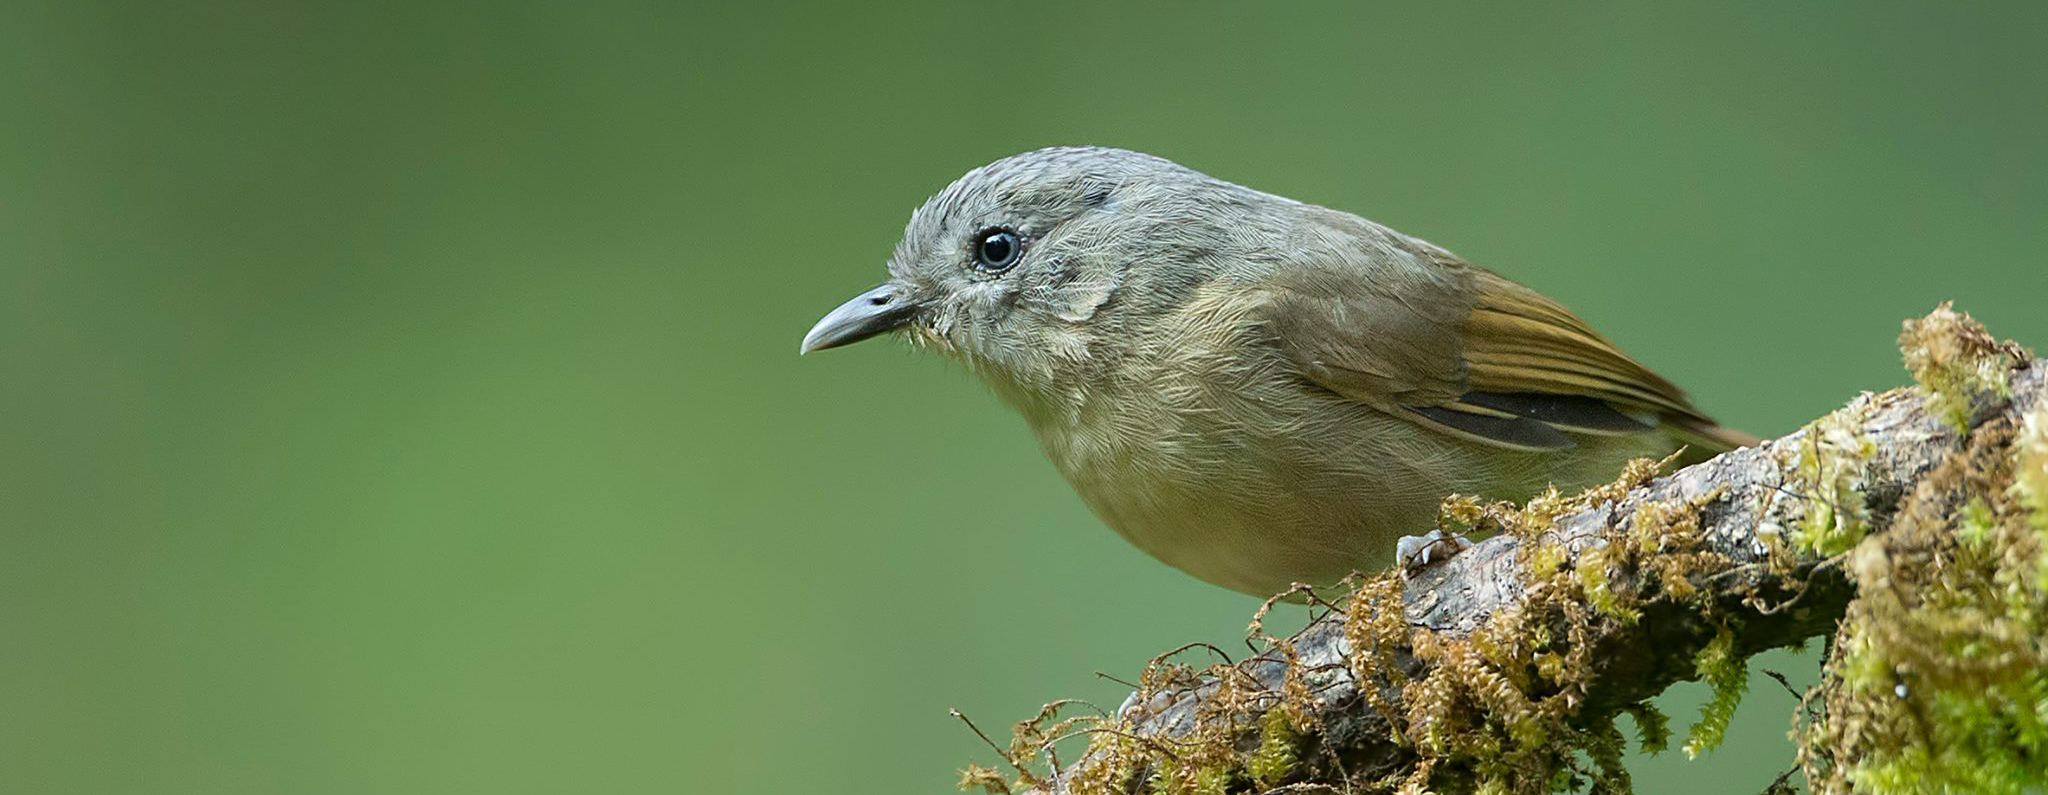
We come across many defensive statements when we question on sub optimum images that we come across everyday – statements defending “why it was not possible to click an ideal image considering that situation”. Difficult light condition, difficult position, clutter in the background, less time available, hostile weather …. many reasons. But why did you make an attempt to click an image in that hostile situation at all is our first question. Many may argue on this but we are clear on one fact – you must know WHEN NOT TO CLICK ! Creative photography is all about deciding the frame first even before being in that location and then be there and wait for that opportunity to come. Most new comers make a common mistake of bumping into an opportunity first and then deciding the frame for it. It doesnt work that way. We repeat, we MUST learn when NOT to click. Dont get impulsive and just keep clicking whatever you see. If we dream about a frame first and then wait and look for that opportunity to arrive, we can do wonders. This image of a Black Naped Monarch was pre planned to be made against a green background. This is shot at Ganeshgudi, Karnataka. For this image the photographer positioned himself in such a way where he gets a green background just presuming that one of the birds will fly into the frame. Fortunately the bird flew into the frame and the desired image was made. It might not have happened – so what ! You need to try again. Making a good image is not an over the counter job.
BEING DOWN TO EARTH !!
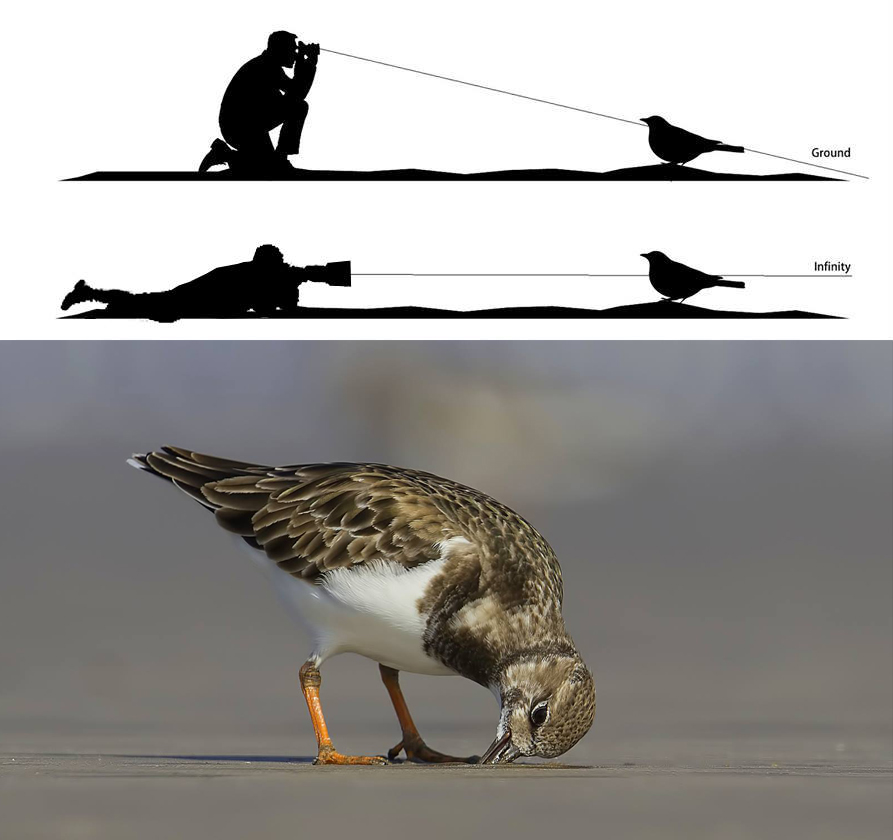
We keep saying, ‘Being down to earth gives you good results’. It is literally true in wildlife photography. If you are new to wildlife photography, you must have wondered on many occasions seeing some crazy wildlife photographers lying flat on ground trying to shoot a bird feeding on ground. They are the ones who eat the dust for the best of the images that they are looking for. They are looking for a ground level perspective. This is one perspective, which new comers get a lot hesitant to practice. It dirties your clothes, it dirties you. It might be mud or grass or thorns or stones. It may bruise your elbows and knees. But if you are looking for that classy picture and are ready to be down to earth, then our sincere advise is – always try ground level shot for a ground dwelling bird … in fact we would rather say don’t ever shoot a ground dwelling bird from any other perspective other than lying flat on ground. It is only when you see the result you realize that it was worth making that stretchy effort.
Reason is simple. A cluttered background is the least preferred thing in wildlife photography. Even if you are grounded (say kneeling down), still even 10 degree elevation causes the ground next to the bird to become the background of your image. That’s going to spoil your image. The adjoining diagram will make you understand this easily. Its only when you are flat on ground, you get infinity as your background and that helps you get images as one shown here. There is no shortcut to this. You have to dirty your clothes to get that beautiful, creamy background. Good place to practice this are the beaches. Select a beach, known for birds. Be there ahead of the high tide time. Ground yourself to one place and wait for the shoreline birds to come closer. As you approach the high tide time, the shore birds will start coming closer and closer to you. Don’t make conspicuous movements and stay calm. If you are patient and silent, you may be very lucky to shoot something like this. So learn to be down to earth, it will surely pay you good results. We understand that its difficult to start off alone doing crazy things all of a sudden, and hence in most of DCP Workshops and Photo Tours this is extensively practiced, so that the habit gets imbibed into you.
IMPORTANCE OF BACKGROUND
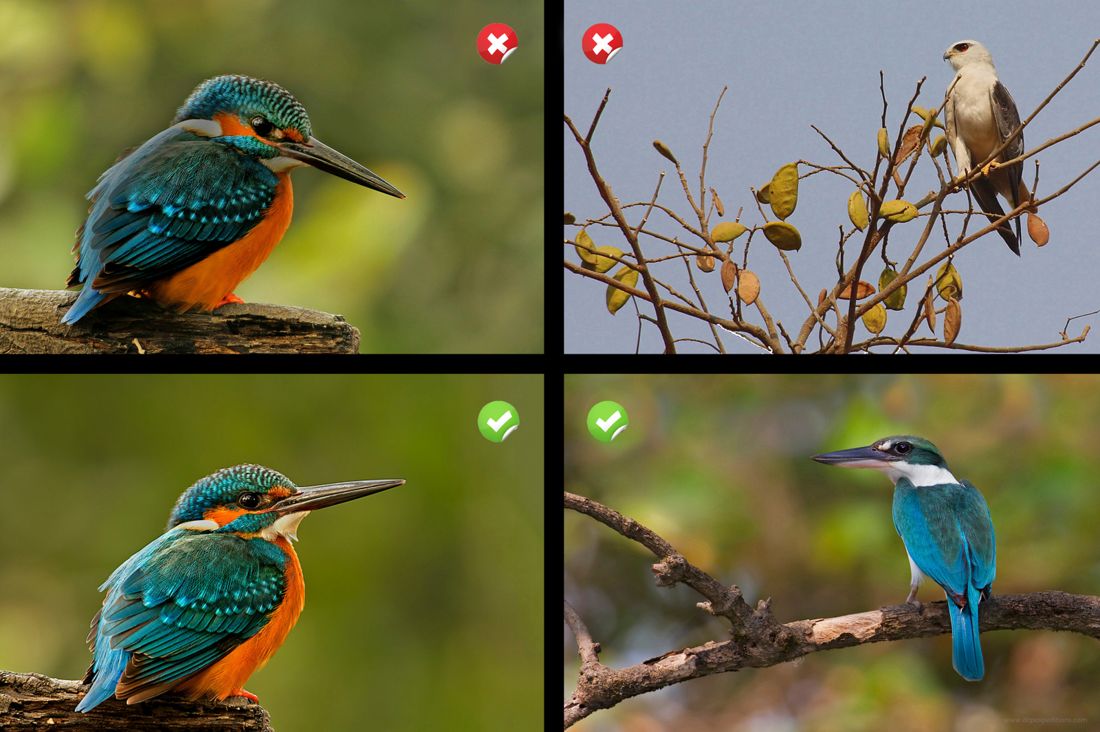
Most of the times, in the excitement of getting a subject to shoot, many completely forget that background forms the major portion of the image and viewers’ attention gets totally distracted off the subject if there are clutters in the background. By clutter, we mean twigs, leaves, branches, people, architecture, garbage – anything or even too much of bright specs contributed by some object brightly lit. We call them specular highlights in background. We have been insisting on this frequently and now here is a demonstration of a clean background. You may question – its not always possible to get this background. We advise not to shoot when you dont have a good background. If you want a record shot, go ahead and keep the image for your record. But remember, if an image doesn’t have a clean background, it isn’t a good image. We request all to refer the first paragraph written on ‘When NOT to shoot’. Always try to re-position yourself in the field in such a way that you get the best of the backgrounds and you HAVE to take this decision in the field. We come across on a daily basis, hundreds of images where this vital aspect of photo composition is ignored. The subject might be brilliantly exposed and framed but one bright patch in the background could be an absolute distraction. Unfortunately while shooting, we are so busy concentrating on the subject, we hardly pay attention to the background. It doesn’t cost us anything other than shifting to the right / left / up or down by a few degrees only and you are likely to get a completely different soothing background. Refer the set of images below in the left hand side for a better understanding of what is being discussed here.
Now that we are talking about being chosy about the background, we must also spend some time discussing one more vital aspect in this context. This is about using sky as a background. There are various schools of though in this regard. We keep emphasizing the importance of avoiding sky as a background in bird images. Refer the set of images below in the right hand side. A featureless plain and simple sky is too bland and doesn’t add any value to the image, however strong your subject is. But, a background with a patch of green gives the feel of wilderness to your subject. It also adds a lot of value to the entire composition since it is not bland and uniform. It also helps to make your subject visible more prominently. Not only this, there is an even more important reason why you must include green in background. If you understand camera’s metering system well, you will know that the digital camera can work at its best yeilding the most correct expsure readings only when 18% of incident light on a subject is reflected. That is how indirect metering systems work. When you keep bright sky as a background, the light is certainly more than 18% and hence the camera’s intelligence may do mistakes. It tries to underexpose your entire frame including the subject and causes loss of detail on the subject. In such situation, you must compensate positive. But better idea is to keep green background. When you have green in the background, it adds a lot of midtone to your frame which is capable of reflecting approximately 18% of incident light and hence you get a much better exposure. On the contrary, when the background is dark, your camera always tries to read from the background and overexpose the frame. That’s how it is supposed to behave as. In such a situation, if you compensate negative.
SHOOT AT EYE LEVEL
Don’t shoot a bird, which is sitting on a perch above your eye level. First reason is, you get to shoot only the under parts of the bird, which is aesthetically not very motivating for a viewer. Secondly, by shooting from below, you also indulge in making sky as the background. We already discussed about it. Refer the above set of images in the right once again. In the first image here, the photographer is shooting from below the tree, with an angle of nothing less than 45 degree elevation, which is not a good idea. In the next image below, the photographer is shooting almost at 0 / 10 / 15 degree angle which gives a soothing eye level shot. Its not always possible to get them at eye level. The simple decision should be not to shoot if you are looking for creative good images. Here is however, one solution. You may try to reposition yourself in such a way that the bland sky doesn’t make the background. In our view, sky makes the most unimpressive background and hence you must make an effort to find out some canopy around in the forest to form the background when you are shooting a subject sitting at an elevation. This is only a suggestion if you are adamant in shooting it. However, we have a better solution if you have the gadget.
Have you ever wondered how do the birds always perch at eye level for all the professional photographers? Its no rocket science. The schematic diagram will make it very simple to understand. Birds are most likely to be found at your eye level only in grasslands areas, because the bushes, shrubs and grasses don’t grow beyond your height. Therefore shooting birds at eye level and getting that creamy smooth BG is a delight in grasslands. However, when it comes to canopy dwelling forest birds, they are at an elevation most of times. But we do come across amazing images of woodland birds shot almost at an eye level. How do you shoot them? Do you elevate yourself up to the canopy? Well the method is simpler than you think. If you have a real good long lens, you just need to walk back. See the diagram below. The man standing immediately next to the tree is shooting almost at 45 degree elevation while the man shooting from a point away is shooting almost at 0 / 10 / 15 degree elevation which will have an effect as good as an eye level shot. How far you can walk back depends on how long and how sharp a lens you have. Shooting from too far a distance is also not recommended. Walking back definitely will compromise the quality of the image in terms of magnification, sharpness and resolution. You are the best person to judge where to strike that balance and you must take a few steps backwards only upto that extent when you feel that the bird appears almost at eye level in the frame.
SHOOTING BIRDS IN FLIGHT
Shooting birds in flight (BIF) is one of the most challenging as well as thrilling area for most Wildlife Photographers. You don’t get the perfect shot in the first attempt – not even the experts. The key to success is patience and perseverance. Keep trying again and again – you will definitely make it. There are a couple of things that we would like to share here, you may find useful. For BIF, contrary to what most will expect, many great photographers have advised to shoot in Av mode (A mode for Nikon users) by default and provided, the light conditions are good, we would probably never need to switch to any other mode. BIF is not an exception. With a relatively wide open aperture and abundant sunlight, you are likely to get good shutter speed (Sometimes as fast as 1/1250 as you can see in this image). Secondly you need to keep your shooting on a continuous mode, which is also known as shutter burst. This means, that once you press the shutter release button, you will keep shooting (depending on the frames per second your camera allows). Now remember, this is different from AI Servo auto focus setting (Continuous Focus in case of Nikon). You need to keep your Auto focus setting into AI Servo so that it keeps focusing and refocusing on your subject as it moves. Thirdly focus tracking. Depending on the model of the camera, you will have varying number of cross type auto focus points, which you can see through the view finder. Activate the zonal selection of the AF points and let automatic AF point selection track your subject as it flies.
DEPTH OF FIELD (DOF)
By definition it is the distance within which your subject is acceptably sharp and it can be controlled by three factors, viz (1) focal length of the lens, (2) aperture and (3) the focal distance (distance of the photographer from the subject). The longer is the focal length of the lens, the shallower is the depth of field. Aperture… wider it is, shallower is the DOF. The third factor that affects depth, which we dont discuss very often – is the focal distance. When a telephoto lens is used at aperture values of f/2.8 or 4 or 5.6 to shoot anything in the minimum focusing distance or just slightly beyond, since all of these factors are combined together, you get a smooth and creamy BG. This image is shot handheld using a 300 mm f/2.8 with 2 X III TC and a Canon 7D body (Effective focal length almost 900 mm) from the car windows with a subject distance of approximately 8.6 meters. Minimal processing done here.


10 Comments
Very useful information for beginners.
Lovely tips. Purely Composition based. Not much reliance on editting. Makes you think about your shot.
Wow, Excellent article, brilliant and very useful. Things to remember on filds, thanks.
Very useful for me.
Very Informative for all Amateurs and wildlife photographers
Thanks a lot for sharing such useful information it will help beginners like me. This information change my view
Very informative and must know tips
Good information.
Very nice and interesting
It’ll help me Lot….